
Top 3 picks at a glance
Best Circular Saws for DIY Projects: Power & Accuracy
The best circular saw for most DIY projects is a 7¼-inch corded model if you make long cuts near an outlet, or a 7¼-inch cordless saw if portability matters and you already own compatible batteries. Choose a smaller blade for lighter sheet-good work, and prioritize a clear cutline, adjustable bevel, effective dust port, and a blade guard that moves freely—not just the highest power figure.
Choose by the work you actually do
For framing, decking, and frequent cuts through thick lumber, a full-size 7¼-inch saw is the flexible default: it can typically cut through 2-inch-thick stock at 90 degrees in one pass. A 6½-inch saw is lighter and often has enough depth for common sheet materials and dimensional lumber, but offers less clearance for thick stock and steep bevels. A compact 4½-inch saw is easier to handle for small panels and trim; it is not a substitute for a full-size saw when cutting thick boards.
As an Amazon Associate we earn from qualifying purchases at no extra cost to you.


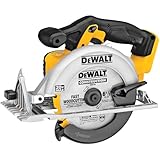

These are typical capacities, not guarantees for every model. Check the manufacturer’s maximum cutting depth at both 90 and 45 degrees before buying. A saw’s bevel range tells you how far the shoe tilts; it does not tell you how much material the blade can cut at that angle.
Decision matrix: match the saw to your setup
| Your situation | Best fit | Why it makes sense |
|---|---|---|
| Occasional cuts, fixed workbench, outlet nearby | 7¼-inch corded saw, roughly 13–15 amps | Consistent power without battery runtime planning; usually the better value if you do not own cordless batteries. |
| Outdoor repairs or work spread across a site | 7¼-inch cordless saw on a battery platform you already use | No cord to manage and easy setup. A second charged battery helps when making repeated cuts. |
| Cabinet parts, thinner panels, or overhead handling | 6½-inch cordless saw | Often lighter and easier to control, with less depth than a 7¼-inch model. |
| Small panels and occasional shallow cuts | Compact 4½-inch saw | Lightweight and convenient, but limited depth makes it a specialized choice. |
| Frequent angled cuts or trim-to-fit work | 7¼-inch saw with a positive bevel stop and clear scale | A readable adjustment and repeatable stop matter more than a large advertised bevel range. |
Examples of established product lines to compare include the corded Makita 5007F, the DeWalt DWE575, and cordless options such as the Milwaukee M18 FUEL 2732-20 or Makita 18V LXT XSH06Z. Check the exact model revision and regional specifications: included accessories, blade, brake, dust adapter, and cutting capacities can differ. Bare-tool prices vary by market and sales; as a broad guide, corded DIY saws often fall around $60–$150, while cordless tools commonly range from $100–$250 bare or $200–$400 in a kit. Premium models can cost more.
Corded vs. cordless: compare usable power, not just the label
A corded saw is a practical choice when you have a safe outlet, make long cuts, or want to avoid buying batteries. Its power is available continuously, but extension-cord choice matters. Use a cord rated for the saw’s load and length, and follow the manual; an undersized or damaged cord can overheat or cause voltage drop.
Cordless saws are much easier to move around, but runtime depends on battery capacity, material, blade sharpness, and how hard the saw is pushed. Battery voltage alone does not tell you how many cuts you will get. If you already own a compatible battery system, the tool-only price can be attractive; if not, include the cost of batteries and charger in the comparison. For repeated cutting, a higher-capacity battery generally provides more working time, but also adds weight.
A simple planning estimate makes the trade-off concrete. Suppose a project needs 24 crosscuts in 2×4 lumber, and your own pace is about 20 seconds of trigger time per cut. That is 24 × 20 = 480 seconds, or 8 minutes of actual cutting—not eight minutes of continuous heavy load. Add time for marking, repositioning, and setup, but do not assume the motor draws maximum power throughout the job. Battery runtime claims are difficult to translate into cut counts because test materials and cutting conditions vary; for a one-day project, bring a charged spare rather than relying on a universal “cuts per charge” figure.
Blade size, bevels, and accuracy
Most DIY buyers should start with the blade size that matches their common stock. A 7¼-inch blade offers broad availability and useful depth for framing lumber. A 6½-inch blade reduces tool size and can be a good fit for plywood and routine home repairs. A 4½-inch blade is best reserved for thinner material within its rated capacity.
Accuracy comes from the whole setup, not a laser or a printed scale alone. Look for a shoe that sits flat, a bevel adjustment that locks without shifting, visible front and side reference marks, and a guard that retracts smoothly. Before a precision cut, unplug the saw or remove its battery, set the blade depth so its teeth extend only slightly below the material, and check that the bevel is locked. Make a test cut in scrap; if the cut wanders, verify the blade is sharp, the material is supported, and the shoe is following a straightedge.
For bevel work, verify the capacity you need rather than assuming that a saw with a 50-degree range can cut thick stock at 45 degrees. Tilting the blade reduces effective cutting depth. A positive stop at 45 degrees speeds up repeatable work, but confirm it on scrap with a square before cutting visible parts.
Dust control and safety features worth checking
Sawing wood produces chips and fine dust. A dust port that accepts a shop-vac hose can improve visibility and reduce cleanup, particularly indoors, but it will not capture everything. Check whether the port is included or requires an adapter, and keep the work area ventilated. For dusty indoor cutting, use suitable respiratory protection and follow the dust extractor and tool instructions.
- Blade guard: It should cover the blade when the saw is not cutting and retract without sticking. Never tie it open or remove it for convenience.
- Electric brake: A useful time-saving feature that stops the blade sooner after releasing the trigger; it does not make a moving blade safe to touch.
- Trigger lockout: Helps prevent accidental starts. Keep your finger off the trigger while positioning the saw.
- Clear sightline: A visible cutline notch and an unobstructed blade area help you follow a mark. Dust blowing away from the line can help, but does not replace dust collection.
- Stable shoe and comfortable grip: A flat base and a grip that lets you control the saw with both hands can reduce wandering and fatigue.
Clamp or otherwise secure the work, support the offcut so it cannot pinch the blade, and keep both hands clear of the cut path. Stand slightly to one side of the blade’s line, let the saw reach speed before entering the material, and guide it without forcing it. Disconnect power before changing blades or adjusting the tool. Wear eye and hearing protection, and use a blade suited to the material; a sharp, appropriate blade cuts more cleanly and puts less strain on the saw.
A practical buying checklist
- Choose 7¼ inches for maximum versatility, 6½ inches for a lighter general-purpose saw, or 4½ inches for shallow, compact work.
- Buy corded for stationary, repeated work near an outlet; choose cordless when mobility matters or you already own the battery platform.
- Confirm cutting depth at 90 and 45 degrees against your thickest planned material.
- Check bevel adjustment, cutline visibility, guard movement, and dust-port compatibility before deciding.
- Budget for a suitable blade, clamps, protective equipment, and—if cordless—a battery and charger.
For a first DIY circular saw, a 7¼-inch corded model is the simplest value choice for work near power. If you need to move freely, a 7¼-inch cordless saw on a battery system you already own is the more convenient pick. Either can make accurate cuts when its capacity fits the material and the work is supported, measured, and cut safely.
Frequently asked questions
Can a circular saw cut through a 2×4 in one pass?
A full-size 7¼-inch circular saw can typically cut through 2-inch-thick stock at 90 degrees in one pass. Confirm the manufacturer’s maximum cutting depth for the specific model, because capacities vary. At a bevel, effective cutting depth is reduced, so check the rated capacity at the angle you plan to use before cutting.
Should I buy a saw with a laser guide?
A laser guide is not essential for accurate cuts. Accuracy depends on the shoe sitting flat, a locked bevel adjustment, visible reference marks, smooth guard movement, proper material support, and a sharp blade. A clear cutline notch can help you follow a mark, but a laser or printed scale alone does not guarantee accuracy.
What blade should I use with a circular saw?
Use a blade suited to the material and keep it sharp. A sharp, appropriate blade cuts more cleanly and puts less strain on the saw. Before buying, also consider blade availability for the saw size you choose. For precision work, make a test cut in scrap and check that the cut follows the intended line.
How can I prevent a circular saw from wandering during a cut?
Support the material, secure it with a clamp or another suitable method, and support the offcut so it cannot pinch the blade. Let the saw reach speed before entering the material, then guide it without forcing it. If the cut wanders, check the blade, material support, and whether the shoe is following a straightedge.
Do I need a shop vacuum for a circular saw?
A shop vacuum is useful but not required. A compatible dust port can improve visibility and reduce cleanup, especially indoors, although it will not capture everything. Check whether the adapter is included. Keep the area ventilated, follow the tool and extractor instructions, and use suitable respiratory protection for dusty indoor cutting.


