
If your camera suddenly looked sharp yesterday and soft today, the culprit is usually the update itself — not your hardware. A Windows update can replace your camera driver with a generic one, reset privacy and camera settings, or change how apps request video resolution. The good news: this is almost always fixable in under 30 minutes without buying anything. The risk of doing it badly is wasted money on a replacement webcam you didn’t need, or worse, installing driver packages from sketchy “driver updater” sites that load adware onto your machine. Work through the steps below in order, and only shop for new hardware at the end if the image is still soft.
What You Need
| Item | Why | Optional? |
|---|---|---|
| Microfiber cleaning cloth | Smudges and dust on the lens cause blur that gets blamed on updates | No |
| Your laptop or desktop PC | You’ll check drivers, settings, and app permissions | No |
| An internet connection | Needed to pull the correct driver from Windows Update or the manufacturer’s site | No |
| Bright, indirect light source | Lets you judge whether blur is optical (focus/exposure) or image-quality related | Yes |
| USB extension cable (6 ft, around $8–$12) | Repositions an external webcam for a sharper focus distance | Yes |
Step-by-Step
Step 1: Clean the Lens (2 minutes)
Before touching a single setting, wipe the lens with a dry microfiber cloth. Laptop webcams sit at the top of the screen, collect fingerprints from lid-closing, and gather dust in the hinge area. A surprising number of “blurry after update” complaints turn out to be grease smears. Use a dry cloth first; only use a drop of lens cleaner if there’s stubborn film. Do not use paper towels — they can micro-scratch plastic lens covers.
As an Amazon Associate we earn from qualifying purchases at no extra cost to you. Product prices and availability are accurate as of the date shown and are subject to change.

Step 2: Restart and Confirm the Update Actually Finished (5 minutes)
Sometimes an update finishes installing drivers in the background after reboot, or a partial install leaves the camera stack in a bad state. Restart your PC fully (not sleep), then go to Settings > Windows Update and click “Check for updates.” If additional updates appear — especially anything listed under “Driver updates” — install them and restart again.
Step 3: Check Camera Privacy Settings (3 minutes)
Updates routinely reset privacy toggles. Go to Settings > Privacy & security > Camera. Make sure “Camera access” is On, “Let apps access your camera” is On, and the specific apps you use (Zoom, Teams, Skype) are individually enabled. When an app can’t fully access the camera, some drivers fall back to a low-resolution preview mode that looks blurry even though the camera is capable of more.
Step 4: Verify the Camera Resolution and Disable Auto-Exposure Resets (5 minutes)
Open the Camera app (built into Windows), click the settings gear, and look for resolution or “picture quality” options if your driver exposes them. Then open the app where you noticed the blur — Zoom, Teams, or Skype — and dig into its video settings. In Zoom: Settings > Video > check “HD” is enabled and confirm the selected camera matches your actual device, not a virtual camera left over from another app. Virtual camera software (snap camera filters, meeting recorders) is a common post-update conflict because updates sometimes reorder device priority.
Step 5: Roll Back or Reinstall the Camera Driver (10 minutes)
This is the fix for most genuine update-related blur. Right-click the Start button, choose Device Manager, expand “Cameras” or “Imaging devices,” and right-click your webcam. First try “Update driver” > “Search automatically for drivers.” If the blur began right after the update, click “Properties” > “Driver” tab > “Roll Back Driver” if it’s available — this restores the previous driver version that worked. If roll-back is grayed out, choose “Uninstall device,” then restart; Windows will reinstall a fresh copy automatically.
Step 6: Download the Manufacturer’s Driver Directly (10 minutes)
If Windows reinstalls the same problematic generic driver, go to your PC maker’s support page (or the webcam brand’s site for external cameras), enter your model, and download the official camera driver for your version of Windows. Avoid third-party “driver updater” utilities — they’re frequently bundled with adware and add no real value. Install, restart, and test again in your meeting app.
Step 7: Check Focus Distance and Lighting (5 minutes)
Many webcams have fixed-focus lenses sharp from roughly 16 to 40 inches away. If you’ve recently moved your monitor or desk, sitting closer than about 14 inches can produce softness unrelated to any update. Sit at your normal distance, face a window or lamp (light from behind you, not behind the screen), and check again. Cheap fixed-focus cameras get noticeably softer in dim rooms because the driver boosts exposure and gain, smearing detail. If your webcam has autofocus, gently tap the camera housing — a stuck focus motor is more common than people think.
Step 8: Test Across Two Apps (5 minutes)
Open both the Windows Camera app and a browser-based test. If the image is sharp in one app but blurry in another, the problem is that app’s settings or its own post-update permission state, not your camera or driver. Go back to Step 4 and re-check that app’s video configuration.
Mistakes to Avoid
Installing random driver-updater software. These tools rarely fix anything real and sometimes install adware or wrong drivers. Stick to Windows Update and the manufacturer’s own site.
Buying a new webcam before checking permissions. A $10 fix beats a $80 replacement. Work through software causes first — a fallback low-resolution mode caused by privacy settings is the single most common misdiagnosis.
Cleaning the lens with window cleaner or alcohol wipes. These can cloud anti-reflective coatings on the small plastic lens covers most webcams use. A dry microfiber cloth is enough 95% of the time.
Uninstalling drivers repeatedly without restarting. The reinstall only completes properly after a full reboot; uninstalling three times in a row without one just stacks errors.
Blaming autofocus for blur in low light. Even good cameras soften in dim rooms because drivers raise exposure time. Fix the lighting before assuming hardware failure.
How Often
Check for camera driver updates roughly once a month, or after any major feature update. Wipe the lens weekly if you’re on frequent video calls — laptop cameras collect oils quickly. Do a full settings review (privacy toggles plus app-level video settings) two or three times a year, since Windows tends to reset some of these with cumulative updates. Expect a driver hiccup after a big update every year or so; knowing the roll-back trick in Step 5 means it’s a ten-minute fix instead of a weekend of frustration.
When to Call a Pro or Replace
If you’ve rolled back drivers, reinstalled from the manufacturer, tested in multiple apps, and the image is still soft at correct focus distance in good light, the camera hardware itself has likely degraded or the ribbon cable to a laptop’s internal module has worked loose. For laptops, an internal webcam replacement typically runs $40–$80 in parts plus an hour of labor if you’re not comfortable opening the chassis — at that point an external camera is usually the smarter buy.
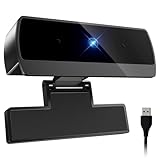
For replacement, you don’t need to spend much. The Diccik 1080P Webcam with Microphone ($9.99) is a solid budget pick: full HD 1080p, built-in light correction for dim rooms, plug-and-play on Windows and Mac, and it works with Zoom, Skype, and Teams with no driver install — which conveniently sidesteps the whole update-driver problem in the future. If you want sharper detail and extra features, a 4K webcam with Windows Hello facial recognition at $79.99 lets you log in to your PC with your face and delivers dramatically more resolution than any built-in laptop camera; you can also crop into the 4K image in software and still exceed 1080p quality.
FAQ
Why did Windows Update break my webcam quality?
Updates often replace your camera’s manufacturer driver with a generic one, reset privacy permissions, or change default resolution handling in apps. The camera hardware hasn’t changed — only the software telling it how to run, which is why the fix is almost always a driver roll-back or reinstall rather than new hardware.
How do I know if it’s the driver or the camera itself?
Test in two different apps (Step 8). If the image is blurry everywhere, including the Windows Camera app in bright light at proper focus distance, try the driver roll-back in Step 5. If roll-back isn’t available and a clean reinstall doesn’t help, the hardware is the likely problem.
Does a higher-resolution webcam fix blur permanently?
Only if the blur was caused by low resolution to begin with. A 1080p external webcam (many under $15, like the Diccik at $9.99) will look sharper than a 720p laptop camera, and a 4K model at around $80 gives room to crop. But no resolution upgrade fixes a dirty lens, bad lighting, or a misconfigured app.
Will the next Windows update undo my fix?
Occasionally, yes — a feature update can reapply a generic driver. If it happens again, the driver roll-back trick takes under ten minutes once you know where to find it. Some people avoid repeat issues entirely by using a plug-and-play USB webcam, since it ships with its own stable driver and bypasses the built-in camera stack.


