
Acoustic panels are a game-changer for home studios, remote offices, and home theaters. They absorb mid-to-high frequency reflections, control flutter echo, and elevate your overall sound quality. However, mounting them incorrectly is a fast track to home improvement headaches. Standard installation methods often rely on heavy-duty construction adhesives, liquid nails, or aggressive toggle bolts. When it comes time to move or rearrange your space in 2026, pulling these off will tear away the drywall’s paper facing, crumble the underlying gypsum, and leave you with a costly, dusty patching and painting job. For renters, this mistake can easily wipe out a security deposit.
Fortunately, you do not have to sacrifice your walls for pristine acoustics. By choosing the right damage-free mounting hardware and preparing your surfaces correctly, you can achieve a professional, flush-mount acoustic setup without driving a single heavy nail or ruining your paint. Whether you are hanging lightweight open-cell foam or heavier fabric-wrapped fiberglass panels, this guide will show you how to do it safely and cleanly.
As an Amazon Associate we earn from qualifying purchases at no extra cost to you. Product prices and availability are accurate as of the date shown and are subject to change.

What You Need
Before you begin, gather your tools. The key to damage-free mounting is matching your hardware to the weight and material of your acoustic panels. Open-cell polyurethane foam panels are incredibly light (often weighing under 0.5 pounds each), whereas fabric-wrapped fiberglass or wooden slat panels can weigh anywhere from 2 to 10 pounds. Below is the essential gear list for a clean, damage-free installation.
| Item | Why You Need It | Optional? |
|---|---|---|
| Acoustic Panels | The primary sound-absorbing elements (foam, polyester, or fabric-wrapped fiberglass). | No |
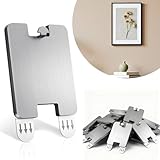
| BYSMAH Picture Hangers Without Nails ($7.99 – $9.99) | Heavy-duty drywall hooks with 20 pieces of removable adhesive strips. Perfect for panels with rigid backings. | No (or equivalent adhesive hooks) |
| GearFusion Picture Hanging Hooks ($8.99 – $11.00) | Universal hangers that hold up to 8 pounds. They leave only a tiny pinhole, far smaller than drywall anchors. | Yes (recommended for heavier fabric-wrapped panels) |
| 91% Isopropyl Rubbing Alcohol | Cleans the wall surface to ensure adhesive strips bond properly without slipping. | No |
| Painter’s Tape and Pencil | Used to map out your acoustic grid on the wall without leaving marks. | No |
| Laser Level or Bubble Level | Ensures your panel layout is perfectly straight and professional-looking. | No |
| Cardboard or Corrugated Plastic Sheets | Provides a flat, rigid backing for soft foam panels so adhesive strips can stick. | Yes (only required for soft foam panels) |
Step-by-Step
Follow these steps to mount your acoustic panels securely. This process works for both lightweight foam and heavier, framed panels.
Step 1: Prep and Clean the Wall (Time: 10 minutes)
Adhesive strips fail because of invisible dust, oils, and drywall residue. For a lasting bond, clean the exact spots where your panels will hang. Dampen a clean microfiber cloth with 91% isopropyl rubbing alcohol and gently wipe down the wall surface. Do not use household surface cleaners, as they often leave behind a slick silicone residue that prevents adhesives from bonding. Allow the wall to air-dry completely for 5 to 10 minutes before moving to the next step.
Step 2: Map and Measure Your Grid (Time: 15 minutes)
Acoustic panels look best when arranged in tight, symmetrical grids or staggered patterns. To avoid repositioning panels later—which weakens the adhesive—map your layout first. Use a bubble level or a laser level to project a straight line across your wall. Outline the corners of your planned panel array using low-tack painter’s tape. This gives you a clear visual guide and ensures your panels are level without leaving pencil marks directly on your drywall.
Step 3: Prepare the Panel Backings (Time: 20 minutes)
How you prepare your panels depends entirely on their material:
- For Soft Foam Panels: Open-cell foam is highly porous, meaning adhesive strips will not stick directly to it. To solve this, cut small 3-inch by 3-inch squares of thin cardboard or corrugated plastic. Use a small dab of hot glue or spray adhesive to mount these squares to the back corners of your foam panel. Once dry, you now have a flat, non-porous surface to attach your adhesive strips.
- For Framed or Rigid Panels: If you are using panels with wood frames or rigid backing, you can use specialized damage-free hanging kits. Apply the adhesive strips from the BYSMAH Picture Hangers kit directly to the back of the panel frame. If your panels weigh between 4 and 8 pounds, you can use the GearFusion Picture Hanging Hooks. These clever hooks slide directly through the drywall with a tiny, needle-thin wire, supporting heavy loads while leaving a hole so small it can be filled with a dab of paint or spackle when removed.
Step 4: Apply Adhesives and Mount (Time: 15 minutes)
If using adhesive strips, peel the protective liner and press the strip firmly onto your prepared backing square or panel frame for 30 seconds. Next, peel the wall-side liner, align the panel with your painter’s tape guide, and press the panel firmly against the drywall. Hold pressure for at least 30 seconds to activate the pressure-sensitive adhesive. For the best results, if your hanging strips allow for temporary removal (like hook-and-loop styles), detach the panel gently, press the wall-mounted strip directly with your fingers for another 30 seconds, and wait 1 hour for the bond to cure before reattaching the panel.
Mistakes to Avoid
- Applying Adhesives to Fresh Paint: Do not use adhesive strips on walls painted within the last 30 days. Fresh paint needs a full month to cure completely; applying adhesive too early will bond to the uncured paint layer, peeling it right off the drywall when removed.
- Ignoring Weight Limits: Always weigh your panels before selecting hardware. Standard adhesive strips are rated for specific weights (usually 3 to 12 pounds per set). Overloading them will result in fallen panels and damaged corners. For panels approaching 8 pounds, always opt for a mechanical damage-free option like the GearFusion hooks.
- Pulling Strips Outward: When removing adhesive hangers, never pull the tab outward toward you. This concentrates the force on the drywall paper and will rip it. Always pull the tab straight down, parallel to the wall, stretching it slowly up to 15 inches until the hook releases.
- Skipping Wall Prep: Skipping the alcohol wipe-down is the number one cause of falling panels. Even clean-looking walls have a micro-layer of dust that compromises adhesive chemistry.
How Often to Inspect and Maintain
Acoustic panel installations are mostly hands-off, but they do require light maintenance to ensure they stay secure. Once every six months, gently press on the corners of your adhesive-mounted panels to check for any lifting or curling. If you live in a region with high seasonal humidity, perform this check at the start of summer and winter, as extreme moisture or dry air can degrade adhesive bonds over time. Additionally, run a vacuum with a soft brush attachment over your panels every three months to prevent heavy dust accumulation, which can add unnecessary weight to your mounting hardware.
When to Call a Pro or Replace
While DIY damage-free mounting is perfect for standard wall-mounted panels, some situations require professional help or permanent mechanical fasteners. If you are mounting heavy wooden acoustic diffusers or fabric-wrapped panels weighing more than 15 pounds, adhesive and light-hook methods are not safe. Heavy items require stud-mounted hardware to prevent structural hazards.
Furthermore, if you are attempting a ceiling installation, do not rely on adhesive strips. Gravity works constantly against the adhesive bond, and a falling ceiling panel can cause injury. For ceilings, call a professional installer to secure the panels using specialized ceiling track systems or screw-in eye hooks. Finally, replace your acoustic panels if you notice the foam crumbling, shedding powder, or emitting a chemical odor—this indicates the polyurethane has degraded, and the panels are no longer effective at absorbing sound.
FAQ
Can I use command-style adhesive strips on textured drywall?
Adhesive strips require flat, continuous contact with the wall to hold weight safely. If you have light orange peel texture, they may hold lightweight foam panels, but heavy knock-down or popcorn textures will prevent a secure bond. For textured walls, using tiny-pinhole hangers like GearFusion hooks is a much safer, more reliable option.
Will acoustic panels completely soundproof my room?
No. Acoustic panels are designed for “sound absorption” (improving the sound quality inside the room by reducing echo). They do not block sound from entering or leaving the room. Soundproofing requires adding mass, density, and air gaps inside the walls to block transmission.
How do I get hot glue off my foam panels if I want to reuse them?
To safely remove hot glue from foam or cardboard backings, apply a few drops of isopropyl alcohol around the edges of the hardened glue. Let it sit for a minute. The alcohol breaks the bond of the hot glue without melting the foam, allowing you to peel the glue glob off cleanly.
Are polyester fiber panels easier to mount than polyurethane foam?
Yes. Polyester fiber panels are rigid, flat, and dense. Unlike porous polyurethane foam, polyester panels have a smooth back surface that accepts adhesive strips directly without the need to glue cardboard backing squares first, saving you step-by-step prep time.
