
Navigating the market for studio microphones can feel overwhelming, especially with the sheer volume of gear released heading into 2026. Whether you are upgrading your streaming setup, recording professional voiceovers, or tracking vocals for music, choosing the right tool requires looking past flashy marketing terms. Manufacturers love to throw around technical jargon, but most buyers only need to understand a few fundamental concepts to make a smart investment that lasts for years.
This decision guide cuts through the noise to focus on what actually impacts your audio quality. By prioritizing core specifications, understanding your room acoustics, and matching gear to your specific workflow, you can avoid costly buyer’s remorse. Let’s break down the critical factors you need to evaluate before purchasing your next studio microphone to ensure your voice comes through with absolute clarity.
As an Amazon Associate we earn from qualifying purchases at no extra cost to you. Product prices and availability are accurate as of the date shown and are subject to change.
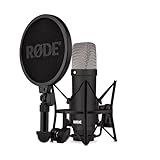
Understanding Polar Patterns and Room Rejection
The polar pattern dictates how a microphone captures sound from different directions around the capsule. For the vast majority of creators, a cardioid polar pattern is the absolute gold standard because it picks up sound primarily from the front while heavily rejecting audio from the sides and rear. This directional focus is crucial if your recording space is not professionally soundproofed, as it helps minimize unwanted computer fan noise, mechanical keyboard clicks, and room echoes from bouncing into your track.
While multi-pattern microphones offer figures-of-eight or omnidirectional settings, they are generally unnecessary unless you plan to record face-to-face interviews or capture an entire acoustic ensemble with a single mic. Stick strictly to a fixed cardioid pattern if your primary goal is clean, isolated voice recording in a typical domestic room setting without advanced acoustic treatment.
XLR Connections Versus Digital USB Integration
Deciding between an analog XLR connection and a digital USB plug-and-play setup fundamentally changes your hardware ecosystem and overall flexibility. XLR condensers require an external audio interface that supplies phantom power to energize the internal capacitor plates. This analog route gives you ultimate control over your preamps, expansion capabilities, and signal chain routing, making it the preferred choice for serious studio setups that may grow over time.
Conversely, USB condensers have built-in analog-to-digital converters and headphone monitoring jacks, allowing you to plug directly into your computer without extra boxes. Modern USB models have closed the performance gap significantly, but they still lack the hardware upgrade path of an XLR setup. Consider how much you plan to expand your audio gear over the next few years before committing to an interface-dependent or direct-USB workflow.
Interpreting Frequency Response and Self-Noise
When reviewing manufacturer specifications, frequency response charts and self-noise ratings tell the true story of a microphone’s acoustic performance. A standard frequency response covers the human audible spectrum, but you must pay close attention to high-frequency presence boosts—peaks in the treble region that add clarity but can sometimes make sibilant voices sound harsh or fatiguing during long listening sessions.
Self-noise, measured in decibels, indicates how much electronic hiss the microphone generates on its own when operating in absolute silence. Lower self-noise ratings are vital for quiet recording environments, ensuring that subtle voice details do not get buried under an unwanted electronic floor hiss. High-end condensers boast exceptionally low self-noise figures, while budget models might require minor noise-reduction plugins in your streaming or editing software.
Acoustic Environment Compatibility
Condenser capsules are notoriously sensitive to sound pressure and air movement. They capture transients, breaths, and room reflections with stunning detail. This high sensitivity is a double-edged sword: while it delivers studio-quality articulation, it also exposes bad room acoustics. If your recording space features bare walls, hardwood floors, and large glass windows, a sensitive condenser will highlight every flutter echo and slap-back reflection.
Before purchasing a high-end condenser, evaluate your physical recording space carefully. Adding basic acoustic treatment—such as absorption panels, heavy curtains, or even bookshelves filled with irregular objects—will yield a more dramatic improvement in your final audio than upgrading from a mid-tier microphone to a flagship model in an untreated echo chamber.
Common Buying Mistakes to Avoid
One of the most frequent mistakes buyers make is ignoring physical mounting requirements. Studio condensers are often heavy and sensitive to handling vibrations transmitted directly through desk stands. Failing to budget for a proper suspension system can ruin otherwise pristine recordings with low-end rumble every time you touch your desk. Another common pitfall is overspending on high sample rates while ignoring proper gain staging and microphone placement technique.
Additionally, buyers often purchase dynamic microphone accessories like heavy foam windscreens that unnecessarily dull a condenser’s natural high-end detail. Always match your pop filters and mounting hardware to the specific aerodynamic profile of your chosen microphone to maintain optimal frequency response.
When to Spend More on a High-End Model
Entry-level and mid-tier microphones offer incredible value today, handling casual streaming and basic voice work with absolute ease. However, there are specific scenarios where investing in a premium studio condenser makes financial and technical sense. If your livelihood depends on broadcast-quality voice acting, commercial production, or capturing delicate acoustic instruments with rich harmonic detail, a premium capsule provides the nuance and transient response that cheaper alternatives simply cannot replicate.
Higher-end models also feature superior component builds, better internal shielding against electromagnetic interference from routers and power supplies, and tighter manufacturing tolerances that ensure long-term reliability and unit-to-unit consistency.
Related Guides
To continue researching your ideal audio setup, explore our comprehensive guides covering the Best Studio Condenser Microphones available on the market. If you need hardware to isolate your recordings from desk vibrations and mechanical bumps, take a look at the Best Shock Mounts for Studio Microphones. For creators seeking a streamlined workflow without external audio interfaces, our detailed breakdown of the Best USB Condenser Microphones provides excellent portable alternatives for any budget.
FAQ
Do all studio condenser microphones require phantom power?
Standard XLR condenser microphones require external phantom power supplied by an audio interface or dedicated preamp to charge the internal capacitor plates. However, USB condenser models draw the necessary operating power directly through the computer’s USB port, eliminating the need for an external interface.
Can I use a studio condenser microphone in an untreated room?
You can certainly use a condenser in an untreated room, but its high sensitivity means it will pick up unwanted room reflections and background noise. Using a cardioid polar pattern, setting the microphone close to your mouth, and adding basic DIY acoustic treatment will help mitigate these environmental issues.
What is the difference between a large-diaphragm and small-diaphragm condenser?
Large-diaphragm condensers generally offer a warmer tone and lower self-noise, making them exceptionally popular for vocals and spoken word applications. Small-diaphragm condensers provide superior transient response and wider, more linear frequency dispersion, making them ideal for acoustic instruments and overhead recording.
How do I protect my microphone capsule from moisture and plosives?
Always use an external pop filter or a specialized foam windscreen to block high-velocity bursts of air and saliva droplets from hitting the delicate internal capsule. Additionally, store your microphone in a protective pouch or case when not in use to minimize dust accumulation and physical damage.
Related guides
- How to Choose Acoustic Foam Panels: What Actually Matters
- How to Choose Studio Monitors for Home Studios: What Actually Matters
- How to Choose Premium Ndi Ptz Camera and Controller Bundles for Broadcast: What Actually Matters
- How to Choose Video Editing Keyboards for Post Production: What Actually Matters

