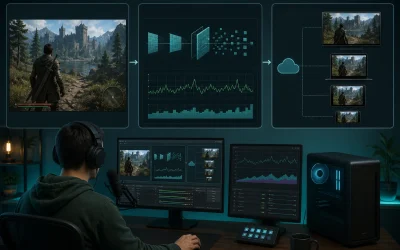
An encoder compresses your raw gameplay and webcam footage into a manageable data stream your internet connection can actually upload in real time, and the specific settings you choose (bitrate, keyframe interval, rate control mode, preset) determine the balance between visual quality, file size or bandwidth usage, and system performance impact. Getting these settings wrong produces blurry motion, stream instability, or unnecessary FPS loss even on otherwise capable hardware and internet connections.
This guide breaks down what each core encoder setting actually controls, the difference between hardware encoders like NVENC and software encoding via x264, platform-specific bitrate limits you need to stay within, and the specific settings combinations that most commonly cause quality problems streamers mistake for hardware or internet limitations.
What an Encoder Actually Does
Raw, uncompressed video from your GPU is enormous, often several hundred megabytes per second at 1080p60, far more data than any home internet upload connection could transmit in real time. An encoder’s job is to compress this raw video down to a fraction of its original size, typically to somewhere between 4 and 8 megabytes per second (32,000-64,000 Kbps) for local recording or considerably less for live streaming, while preserving as much visual quality as possible at that reduced size.
This compression works primarily by analyzing similarities between consecutive frames (since most of a game’s frame does not change dramatically from one instant to the next) and between regions within a single frame, storing only the differences rather than redundant, unchanged information. This is why fast-moving, visually chaotic scenes are harder to compress efficiently than static or slow-moving scenes, and why quality settings that look perfectly clean during a menu screen can show visible compression artifacts during a fast-paced firefight.
The specific settings covered in this guide (bitrate, keyframe interval, rate control mode, preset, and profile) each influence a different aspect of how this compression trade-off is made, and understanding what each one actually controls lets you diagnose specific quality problems (blurriness during motion, blockiness in dark scenes, stream instability) by adjusting the setting actually responsible, rather than blindly increasing bitrate as a catch-all fix that does not always address the real cause.
Encoding happens differently depending on whether you are streaming live (where the encoded output must be transmitted continuously in real time to a platform’s ingest servers under a strict bitrate cap) or recording locally (where you control the entire pipeline and can use higher bitrates and different rate control strategies without an external bandwidth constraint), a distinction covered in more detail later in this guide.
Hardware vs Software Encoders
NVENC, NVIDIA’s dedicated hardware encoding chip built into GeForce RTX and most recent GTX GPUs, has become the default recommendation for the majority of streamers with a capable NVIDIA GPU, since it produces quality very close to well-tuned software encoding on current hardware generations while using only a small fraction of the CPU and GPU rendering resources that software encoding requires. AMD’s AMF and Intel’s QuickSync serve the equivalent role on their respective hardware.
x264, the software encoder built into OBS Studio, encodes video using general-purpose CPU cores rather than dedicated hardware, which historically produced better compression efficiency (better quality per bitrate) than early hardware encoder generations, but this quality gap has narrowed substantially on current-generation NVENC and AMF hardware. The trade-off is that x264 directly competes with your game for CPU resources, making it the riskier choice for CPU-intensive titles or for streamers already running numerous background applications.
Within OBS’s encoder settings, x264 offers a “preset” option (ranging from “ultrafast” to “veryslow”) that trades encoding speed for compression quality; slower presets produce better quality at a given bitrate but demand considerably more CPU processing power, meaning a “medium” or “fast” preset is a more realistic choice for most streaming setups than “veryslow,” which can introduce its own performance problems on systems without substantial CPU headroom to spare.
For nearly all streamers with a discrete GPU manufactured in the last several years, NVENC, AMF, or QuickSync (whichever matches your hardware) is the better default choice over x264, reserving software encoding for the specific case of a system without a capable hardware encoder, or occasionally for very high-end systems with substantial CPU headroom specifically prioritizing maximum compression efficiency over any other consideration.
Bitrate: What It Controls and Platform Limits
Bitrate, measured in kilobits per second (Kbps), controls how much data is allocated to encoding each second of video, directly affecting visual quality; higher bitrate generally means more visual detail preserved, particularly during fast motion and complex scenes, at the cost of more bandwidth (for streaming) or storage (for recording). Bitrate that is too low for your resolution and frame rate produces visible blockiness and blurring, particularly noticeable during fast camera movement or busy on-screen action.
Live streaming bitrate is constrained both by your internet upload speed (a safe target is using no more than 70-80% of your tested upload speed, leaving headroom for other network activity and connection variability) and by the receiving platform’s own maximum accepted bitrate, which varies by platform and account tier. Exceeding a platform’s accepted maximum does not improve quality; the platform’s ingest servers will simply reject or degrade the excess, sometimes producing worse results than staying within the documented limit.
| Platform | Recommended 1080p60 Bitrate | Typical Maximum |
|---|---|---|
| Twitch (non-partner) | 5,000-6,000 Kbps | ~6,000 Kbps |
| Twitch (partner) | 6,000-8,000 Kbps | ~8,000 Kbps |
| YouTube Live | 6,000-9,000 Kbps | ~51,000 Kbps (rarely needed) |
| Kick | 6,000-8,000 Kbps | ~8,000 Kbps |
| Local recording (no cap) | 40,000-60,000 Kbps | Limited by storage speed only |
These platform limits change periodically as platforms update their infrastructure, so checking your specific platform’s current creator documentation before a major stream is worth doing periodically, particularly if you are on the edge of qualifying for a higher partner or affiliate tier with different bitrate allowances than a standard account.
Resolution and Frame Rate Trade-offs
At a fixed bitrate, increasing resolution or frame rate spreads the same amount of data across more pixels or more frames per second, which reduces the data available per pixel and generally reduces visual quality, particularly noticeable as increased blockiness during motion. This is why streaming at 1440p or 4K with a bitrate designed for 1080p produces visibly worse results than simply streaming at 1080p with that same bitrate.
1080p60 has become the practical standard for most streamers balancing quality, platform bitrate limits, and viewer compatibility, since it delivers smooth, detailed motion within the bitrate ceilings most platforms currently allow, while 1440p and 4K streaming remain constrained more by platform bitrate limits than by encoder or hardware capability on modern GPUs, meaning the resolution upgrade often does not translate to a visible quality improvement for live viewers despite using more of your upload bandwidth.
Frame rate (30fps vs 60fps) affects perceived smoothness independent of resolution; 60fps is strongly preferred for fast-paced action games (shooters, racing, fighting games) where motion clarity matters for both aesthetic quality and, in competitive content, actually following the gameplay, while 30fps remains acceptable for slower-paced content (strategy games, narrative adventures, “just chatting” segments) where motion smoothness is less critical to the viewing experience.
For local recording intended for later editing and upload to platforms like YouTube, which support significantly higher bitrates than live streaming platforms, 1440p or even 4K recording is far more viable, since the storage-only constraint (rather than a live bandwidth cap) allows sufficient bitrate headroom to preserve quality at higher resolutions, a distinction covered further in our how to record gameplay without lag guide.
Keyframe Interval and Rate Control Modes
Keyframe interval controls how often the encoder inserts a full reference frame (rather than a frame that only stores differences from the previous frame) into the video stream, measured in seconds. Streaming platforms generally expect a 2-second keyframe interval, since their transcoding and adaptive bitrate systems are built around this standard; a mismatched interval (too long or set to “0”/automatic in some configurations) can cause quality degradation, playback issues for viewers on lower-quality auto settings, or outright rejection by some platforms’ ingest systems.
Rate control mode determines how the encoder allocates bitrate across varying scene complexity. CBR (Constant Bitrate) maintains a steady output bitrate regardless of scene complexity, which is the strongly recommended setting for live streaming since it produces predictable bandwidth usage that platforms and viewer players are built to expect and handle reliably. VBR (Variable Bitrate) allows the encoder to use more bitrate for complex scenes and less for simple ones, improving overall efficiency, but its variability is poorly suited to live streaming’s fixed bandwidth constraints and is better reserved for local recording.
CQP (Constant Quantization Parameter) and similar quality-targeted modes prioritize a consistent visual quality level over a consistent bitrate, which can be useful for recording where file size matters less than uniform quality throughout, but like VBR, its unpredictable bitrate output makes it unsuitable for live streaming, where a sudden bitrate spike during a complex scene could exceed platform limits or your available upload bandwidth.
For nearly all live streaming setups, CBR at your platform’s recommended bitrate with a 2-second keyframe interval is the correct, standard combination; deviating from this without a specific reason (such as local-only recording where different priorities apply) is one of the more common sources of otherwise unexplained stream quality or stability issues.
B-Frames, Profile, and Preset Settings
B-frames (bidirectional predicted frames) allow the encoder to reference both preceding and following frames when compressing a given frame, improving compression efficiency compared to encoding that only references prior frames, but they also add a small amount of encoding latency and complexity. Most modern NVENC and x264 configurations handle B-frames well by default, and manually adjusting this setting is rarely necessary unless you are troubleshooting a specific compatibility or latency issue with a particular platform or use case.
Profile settings (Baseline, Main, High) control which specific compression features the encoder is allowed to use, with “High” profile enabling the most advanced compression techniques and generally recommended for current hardware and platforms, since virtually all modern viewing devices and platform infrastructure support it; “Baseline” exists mainly for compatibility with very old or limited playback hardware that is not a practical concern for most streamers today.
Encoder preset (available for both x264 and, in a more limited form, NVENC) trades encoding speed and system resource usage for compression quality; for NVENC specifically, presets like “Quality,” “Balanced,” and “Performance” (naming varies slightly by OBS version) let you choose between maximizing visual quality and minimizing GPU encoder resource usage, with “Quality” being a reasonable default on current-generation GPUs given how efficient modern NVENC hardware has become.
For x264, presets significantly affect CPU load in a way NVENC presets do not affect GPU load nearly as dramatically; “medium” is OBS’s default and a reasonable starting point, with “fast” or “faster” recommended for systems where CPU headroom is limited, since a preset that is too slow for your CPU’s actual capacity can itself become the cause of dropped frames, defeating the purpose of choosing that preset for quality in the first place.
Platform-Specific Recommended Settings
Beyond bitrate limits, platforms differ slightly in other recommended encoding parameters, and matching these specifics helps avoid platform-side transcoding quality loss or compatibility warnings. The table below summarizes commonly recommended baseline settings across major platforms for a standard 1080p60 stream.
| Setting | Twitch | YouTube Live | Kick |
|---|---|---|---|
| Keyframe interval | 2 seconds | 2 seconds | 2 seconds |
| Rate control | CBR | CBR | CBR |
| Encoder profile | High | High | High |
| Audio bitrate | 160 Kbps | 128-384 Kbps | 160 Kbps |
| Recommended encoder | NVENC/x264 | NVENC/x264 | NVENC/x264 |
These settings represent a reasonable, broadly compatible baseline; some platforms occasionally introduce beta support for newer codecs like AV1 or HEVC for streaming (rather than just recording), which can offer better quality at the same bitrate, but compatibility for viewers on these newer codecs is still less universal than standard H.264, so treat these as forward-looking options to test rather than default replacements until broader platform and viewer-side support matures.
Encoding for Recording vs Streaming: Key Differences
The core difference between recording and streaming encoder configuration comes down to constraints: streaming must fit within a hard, platform-enforced bitrate ceiling and maintain a stable, continuous real-time output, while local recording answers only to your storage drive’s write speed and your own quality preferences, with no external bandwidth authority to satisfy.
This is why CBR at a platform-appropriate bitrate is correct for streaming, while VBR or CQP at a much higher bitrate (40,000-80,000 Kbps or more) makes sense for recording, since recording benefits from the flexibility to allocate more data to complex scenes without worrying about exceeding an ingest limit that simply does not apply to a local file.
Some streamers use OBS’s “Replay Buffer” or a simultaneous local recording alongside their live stream output specifically to capture a higher-quality local copy for later editing or highlight extraction than the stream’s platform-constrained bitrate would allow, which is a reasonable approach on systems with sufficient encoding and storage headroom to handle both outputs simultaneously without introducing dropped frames on either.
If you are running simultaneous stream and local recording outputs, confirm your system, particularly your CPU if using x264 for either output, has sufficient headroom for both encoding tasks running concurrently; using hardware encoding (NVENC) for at least one of the two outputs, ideally both if your GPU supports simultaneous encoding sessions, meaningfully reduces the risk of dropped frames affecting either the live stream or the local recording.
Troubleshooting: Poor Stream Quality Despite High Bitrate
If your stream looks blurry or blocky during motion despite a bitrate that should theoretically be sufficient, first confirm your keyframe interval is set to 2 seconds rather than left on an automatic or longer setting, since an incorrect keyframe interval is a commonly overlooked cause of quality issues that bitrate adjustments alone will not fix.
If quality looks fine during static scenes but degrades noticeably during fast action specifically, this points to either insufficient bitrate for your resolution/frame rate combination or an encoder preset prioritizing speed over quality; on NVENC, switching from a “Performance” or “Fast” quality preset to a “Quality” preset, if your GPU has encoding headroom to spare, often resolves this without needing to increase bitrate beyond your platform’s limit.
If viewers report your stream buffering or dropping quality inconsistently despite your OBS stats showing no dropped frames on your end, the issue is likely occurring on the platform’s or the viewer’s own connection side rather than your encoding setup, though confirming you are not exceeding your platform’s actual accepted bitrate (rather than the theoretical maximum some documentation lists) rules out a self-inflicted version of this problem.
If you recently changed encoders (for example switching from x264 to NVENC or vice versa) and quality changed unexpectedly, remember that equivalent visual quality between the two typically requires different bitrate or preset settings, since they are not perfectly interchangeable at identical settings; retest your quality at your platform’s bitrate cap specifically after any encoder change rather than assuming your previous settings translate directly.
According to Elena Marchetti, Streaming and Creator Editor who benchmarks encoder output quality using controlled test footage on a dual-PC streaming rig, the most common avoidable quality mistake among streamers she consults with is running an outdated keyframe interval setting left over from an old OBS profile or imported scene collection, invisible in casual settings review but directly responsible for platform-side transcoding quality loss that looks identical to a bitrate problem.
For readers building out related parts of their streaming pipeline, our how to record gameplay without lag guide covers the local recording side of encoding in more depth, and our audio setup guide for streamers and how to set up a green screen guides address the other production elements that, alongside correct encoder settings, determine your overall stream quality.
Frequently Asked Questions
What is the best bitrate for Twitch streaming?
Twitch caps non-partner accounts around 6,000 Kbps and partners up to roughly 8,000 Kbps for 1080p output, so setting your OBS output bitrate at 5,500-6,000 Kbps for most accounts, or up to 8,000 Kbps if you have partner-level limits confirmed, uses your full allowance without exceeding Twitch’s ingest limits and risking dropped frames on their end.
Should I use CBR or VBR for streaming?
Use CBR (Constant Bitrate) for live streaming, since it maintains a steady, predictable output that streaming platforms and viewers’ players expect and handle reliably; VBR (Variable Bitrate) is better suited to local recording, where its ability to allocate more data to complex scenes and less to simple ones improves quality-to-file-size efficiency without a live ingest limit to worry about.
Why does my stream look blurry during fast movement even at a high bitrate?
This is typically caused by a keyframe interval set too long, an overly fast/low-quality encoder preset, or genuinely insufficient bitrate for your resolution and frame rate combination; check your keyframe interval is set to 2 seconds and, if using NVENC, confirm you’re on a Quality-focused preset rather than the fastest available option.
What is the difference between NVENC H.264 and NVENC HEVC?
NVENC HEVC (H.265) compresses video more efficiently than H.264, meaning better quality at the same bitrate or the same quality at a lower bitrate, but it has more limited platform and playback compatibility, so H.264 remains the safer default for live streaming while HEVC is often preferable for local recording where compatibility is fully within your control.
How many keyframes per second should I use for streaming?
Set your keyframe interval to 2 seconds for streaming to any major platform (Twitch, YouTube, Kick), since this is the standard most platforms’ transcoding and ingest systems expect; a mismatched keyframe interval is a common, easily overlooked cause of stream quality or stability issues that have nothing to do with your actual bitrate or resolution settings.