
Setting up a home recording space often leads to a common, frustrating realization: your vocals sound boxy, muddy, or plagued by a strange hollow echo. In an attempt to fix it, many creators head online and buy the cheapest, most colorful pack of polyurethane foam wedges they can find, plastering them across their walls. Unfortunately, they soon find that their recordings still sound unprofessional.
The mistake isn’t a lack of effort; it is a fundamental misunderstanding of physics. When learning how to choose acoustic panel density for vocal booth setups, many buyers focus solely on surface area or thickness. In reality, density is the secret metric that determines whether a panel actually cleans up your vocal tracks or simply muffles the high frequencies while leaving muddy low-mids to bounce around your space.
As an Amazon Associate we earn from qualifying purchases at no extra cost to you. Product prices and availability are accurate as of the date shown and are subject to change.


To build a booth that delivers pristine, radio-ready vocals, you must look beyond aesthetic patterns and understand how material mass interacts with sound waves. This guide will break down the exact science of acoustic density, helping you invest your budget where it will make the greatest acoustic impact.
Top 3 picks at a glance
Decide These 3 Things First
Before buying any treatment or raw insulation materials, you must define the scope and purpose of your recording environment. Answering these three questions will narrow down your density requirements immediately:
- What is your vocal style and dynamic range? If you are recording soft spoken-word podcasts or audiobooks, your primary challenge is taming ambient room reflection and maintaining a natural voice tone. If you are belting out operatic vocals or screaming metal tracks, you will push far more low-frequency energy into the room, requiring significantly denser, thicker panels to control the acoustic pressure.
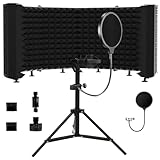
- What is the physical form factor of your booth? Are you treating a dedicated 4′ x 4′ walk-in closet, building a freestanding wooden frame booth, or relying on a portable microphone isolation shield? Portable shields (which typically weigh 2 to 5 lbs and sit directly behind the microphone) use thin, high-density foam to absorb immediate reflections, whereas a full walk-in booth requires a strategic mix of wall-mounted panels.
- Are you trying to absorb sound or block sound? This is the most common point of confusion in home studio design. Acoustic panels *absorb* reflections inside the booth to improve sound quality; they do not stop sound from entering or leaving the room (soundproofing). Soundproofing requires decoupling, air gaps, and massive structural density (like heavy drywall). Acoustic treatment controls the echo *inside* the space you already have.
1. Material Composition and Its Impact on Density
Acoustic density is measured in pounds per cubic foot (lbs/ft³ or pcf) or kilograms per cubic meter (kg/m³). Different materials offer vastly different densities, which directly dictates how they perform across the frequency spectrum.
Open-cell polyurethane foam is the most common entry-level material. Budget-friendly 52-packs of 1-inch wedge panels typically feature a very low density of 1.0 to 1.5 lbs/ft³. While excellent for taming high-frequency flutter echo (above 1,000 Hz), this foam is acoustically invisible to low-mid muddy frequencies (between 150 Hz and 500 Hz), where the human voice carries most of its weight.
For true broadband control, professionals turn to rigid fiberglass or mineral wool. Rigid fiberglass (such as industry-standard Owens Corning 703) features a density of 3.0 lbs/ft³ (48 kg/m³). Mineral wool (such as Rockwool Safe’n’Sound) typically ranges from 2.5 to 4.5 lbs/ft³. At these densities, the fibers are packed tightly enough to slow down air molecules and convert sound energy into heat, absorbing frequencies deep into the lower mids without making the booth sound unnaturally bright or lopsided.
2. Panel Thickness and Air Gaps
Density does not work in a vacuum; it is inextricably linked to panel thickness. A high-density material that is too thin will reflect high frequencies instead of absorbing them, while a thick material with too little density will let sound pass right through and bounce off the hard wall behind it.
For vocal booths, 2-inch thick panels are the sweet spot. A 2-inch panel filled with 3.0 lbs/ft³ mineral wool will effectively absorb down to 250 Hz. If you step up to a 4-inch panel, you can comfortably absorb frequencies down to 100 Hz, which is crucial for deep male voices or podcasts where proximity effect creates a boomy low-end.
You can also cheat physics using air gaps. Spacing a 2-inch thick, medium-density panel 2 inches away from the wall using offset mounting brackets allows the panel to absorb lower frequencies almost as effectively as a solid 4-inch panel. This technique saves money, reduces the physical weight hanging on your walls, and prevents your vocal booth from feeling cramped.
3. Vocal Booth Size and Coverage Area
The size of your recording environment dictates how much coverage you need. In a typical home studio setup—such as a modified 5′ x 5′ spare closet—sound waves strike the walls almost instantly after leaving your mouth. Without proper treatment, these rapid reflections create “comb filtering,” making your vocals sound thin and hollow.
In small spaces, you need high coverage: roughly 60% to 80% of the wall surface area should be treated with absorbing material. If you cannot treat the entire room, focus on the “reflection points” directly to the left, right, and behind the vocalist’s head.
If wall-mounting panels isn’t an option due to rental agreements, portable solutions offer a compromise. A foldable 3-panel microphone isolation shield or an enclosed desktop vocal box (usually measuring around 12″ to 14″ on each side) uses highly compressed, high-density foam to create a localized dry zone right around the microphone capsule. While they won’t fix a terrible-sounding room, they drastically reduce the amount of room sound your microphone picks up in the first place.
4. Construction, Framing, and Mounting Systems
As you increase acoustic panel density, weight becomes a significant logistical factor. A standard 24″ x 48″ acoustic panel made of 2-inch thick, 3.0 lbs/ft³ mineral wool weighs approximately 6 to 8 lbs. If you build a wooden frame around it to protect the edges and wrap it in fabric, that weight can easily jump to 10 to 12 lbs per panel.
Hanging eight of these panels in a small room means adding nearly 100 lbs of weight to your walls. You cannot rely on simple double-sided adhesive tape for these materials. Heavy-duty Z-clips, impaling clips, or heavy-wall anchors are required to keep them securely mounted.
Conversely, low-density polyurethane foam panels (weighing only a few ounces each) can be easily mounted using lightweight adhesive squares or spray adhesive. However, if you plan to upgrade your studio design in the future, keep in mind that spray adhesives can ruin drywall when removed. Many creators mount lightweight foam to temporary foam core boards first, then hang those boards using damage-free picture hanging strips.
5. Price Tiers and Value Analysis
When planning your vocal booth budget, understanding the market tiers helps you avoid overpaying for underperforming materials. As we look at the landscape of home recording gear in 2026, the market generally splits into three distinct pricing segments:
- Budget Tier ($25 – $50): This tier is dominated by portable microphone isolation shields, tabletop enclosed boxes, and bulk packs of thin polyurethane foam. These products are highly accessible and work well for beginners, hobbyist podcasters, or traveling creators who need a temporary, lightweight solution to tame harsh high-frequency reflections.
- Mid-Range Tier ($75 – $200): In this bracket, you will find DIY raw materials (such as buying a multi-pack of mineral wool batts, building simple pine wood frames, and wrapping them in breathable burlap fabric) or pre-fabricated PET polyester acoustic felt panels. This tier offers the best performance-to-cost ratio for serious home recordists who want true broadband absorption without professional installation costs.
- Premium Tier ($300 – $1,000+): This level consists of professionally manufactured, fabric-wrapped rigid fiberglass panels, heavy acoustic baffles, and complete modular vocal booth kits. These products feature certified laboratory testing for absorption coefficients, Class A fire ratings, and furniture-grade wooden framing that looks as good as it performs.
6. Safety, Outgassing, and Fire Ratings
Because vocal booths are small, enclosed, and often poorly ventilated, safety is a paramount concern. Many industrial insulation materials contain formaldehydes, binder chemicals, and loose particulates that can irritate your lungs and throat over long recording sessions.
If you are building DIY panels with mineral wool or fiberglass, always wrap them in a tightly woven, acoustically breathable fabric (if you can blow air through the fabric easily, it is acoustically breathable). This keeps the microscopic fibers trapped inside the panel frame and out of your lungs.
Additionally, pay close attention to fire ratings. Look for materials with a Class A (or Class 1) fire rating under the ASTM E84 standard. Cheap, non-rated polyurethane foams can ignite easily from hot studio lights or electrical faults, releasing highly toxic smoke in a matter of seconds. PET polyester panels and certified mineral wool are naturally flame-resistant, making them much safer choices for confined recording spaces.
Spec Checklist
Use this quick reference table to match your recording goals with the correct material specs, densities, and price expectations.
| Specification | Budget Tier | Mid-Range Tier | Premium Tier |
|---|---|---|---|
| Primary Material | Polyurethane Foam / PET Felt | Mineral Wool (Rockwool) | Rigid Fiberglass (OC 703/705) |
| Target Density | 1.0 to 1.8 lbs/ft³ | 2.5 to 4.0 lbs/ft³ | 3.0 to 6.0 lbs/ft³ |
| Thickness Range | 1″ to 2″ | 2″ to 3″ | 2″ to 4″ (with custom air gaps) |
| Acoustic Performance | High-frequency taming only (>1,000 Hz) | Broadband control down to 250 Hz | Full linear absorption down to 100 Hz |
| Mounting Style | Double-sided tape / Adhesive spray | Impaling clips / Standard wall anchors | Z-clips / Heavy-duty French cleats |
| Average Cost Range | $25 – $50 per pack/shield | $75 – $200 (DIY or multi-packs) | $300 – $1,000+ (Professional kits) |
Red Flags to Avoid When Shopping
When shopping for acoustic treatments, keep an eye out for these misleading marketing tactics and design flaws:
- The “Soundproofing” Label: If a lightweight, 1-inch foam panel claims to “soundproof your room” or “block outside noise,” walk away. Stopping sound requires physical mass and airtight construction. No lightweight foam can keep your neighbor’s dog from barking over your vocal track.
- Mystery Densities: If a manufacturer refuses to list the actual density of their panels in lbs/ft³ or kg/m³, it is almost certainly low-density packaging-grade foam. High-quality manufacturers proudly advertise their material specifications.
- Unrealistic NRC Ratings: The Noise Reduction Coefficient (NRC) ranges from 0.0 (perfect reflection) to 1.0 (perfect absorption). If a 1-inch thick foam panel claims an NRC of 1.0, look closely at the test data. It may absorb 100% of high frequencies, but its overall absorption across the human vocal spectrum is likely much lower.
- Chemical Odors: Low-quality foam panels often arrive tightly vacuum-sealed and release a strong, chemical smell (outgassing) when opened. If a panel smells strongly of industrial solvents, leave it in a well-ventilated garage or outdoor space for several days before installing it in a cramped, enclosed vocal booth.
Frequently Asked Questions
What is the ideal density for a vocal booth acoustic panel?
For standard vocal recording, the ideal density is between 3.0 and 4.0 lbs/ft³ (48 to 64 kg/m³). Materials in this density range, such as rigid fiberglass or mineral wool, provide excellent, balanced absorption across the mid and high frequencies where the human voice resides, preventing your booth from sounding boomy or muddy.
Can I use cheap polyurethane foam packs for a professional vocal booth?
While cheap foam packs (like 1-inch wedge panels) are highly affordable, they only absorb high frequencies. If you cover your entire booth in cheap, low-density foam, you will create an acoustically unbalanced room. The highs will be completely dead, but the muddy low-mids will continue to bounce around, resulting in a dark, muffled, and boxy vocal recording.
Do portable microphone isolation shields actually work?
Portable shields are a helpful supplement, but they are not a complete cure for a bad-sounding room. They work by blocking room reflections from entering the sides and back of directional microphones. However, they cannot stop reflections from bouncing off the wall directly behind the vocalist and entering the front of the microphone capsule. They work best when paired with basic wall treatment.
How does panel thickness relate to density when treating vocals?
Thickness determines the lowest frequency a panel can absorb, while density determines how efficiently it absorbs sound within that range. For example, a 1-inch panel—no matter how dense—cannot absorb low-mid vocal mud because the sound waves are physically too long to be stopped by such a thin barrier. For vocals, you need a minimum of 2 inches of thickness paired with a medium-to-high density material.


