
Top 3 picks at a glance
The Short Answer
For most microphone boom arm desk clamps, allow 2.5 to 3 inches (6.4 to 7.6 cm) of clear vertical space from the top of the desk to anything directly underneath it. That accommodates the typical clamp opening used by consumer microphone arms, which is commonly rated for desk tops up to 2.0 to 2.4 inches (5.1 to 6.1 cm) thick.
You also need room behind or beside the clamp. Plan for at least 3 inches (7.6 cm) of clear desk edge and 2 to 4 inches (5.1 to 10.2 cm) behind the desk if the boom arm’s base, cable routing, or arm joints extend rearward. A low-profile arm may need less rear clearance than a traditional spring-loaded scissor arm, but it can need more clear desktop surface for its wider mounting base.
As an Amazon Associate we earn from qualifying purchases at no extra cost to you. Product prices and availability are accurate as of the date shown and are subject to change.


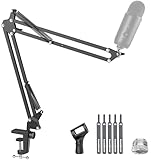

Before buying, measure three things: your desktop thickness, the open space below the mounting edge, and the distance from the desk edge to walls, drawers, monitor arms, or a cable tray. A clamp that technically fits the desktop can still be unusable if a drawer frame or metal support rail blocks the lower clamp pad.
Standard Sizes
| Mounting measurement | Typical size in inches | Typical size in cm | What it means for your desk |
|---|---|---|---|
| Maximum desk thickness for a basic mic-arm clamp | 2.0–2.4 in. | 5.1–6.1 cm | Your desktop must be no thicker than the clamp’s stated opening. |
| Useful under-desk clearance to reserve | 2.5–3.0 in. | 6.4–7.6 cm | Provides room for the lower jaw, screw, and tightening knob. |
| Minimum unobstructed desk edge | 3.0 in. | 7.6 cm | Keeps the clamp away from a rounded edge, apron, or thick lip. |
| Recommended rear clearance for a scissor arm | 3.0–5.0 in. | 7.6–12.7 cm | Allows the arm to pivot without immediately hitting a wall. |
| Recommended rear clearance for a low-profile arm | 2.0–4.0 in. | 5.1–10.2 cm | Usually enough for the base and cable exit, depending on orientation. |
| Common clamp screw/knob depth below the desk | 1.5–2.5 in. | 3.8–6.4 cm | Important when a shallow drawer sits immediately under the desktop. |
| Common mic-arm pole/base diameter | 1.5–2.0 in. | 3.8–5.1 cm | Leave clearance around the mount so the arm can rotate freely. |
Many budget desk clamps, including the style used on basic suspension arms such as the SUNMON metal clamp, are designed around a maximum desktop thickness near 2 inches (5.1 cm). Mid-priced boom arms such as the InnoGear models commonly fit desks up to about 2.36 inches (6 cm). Larger low-profile arms, including products in the class of the FIFINE BM88, often use a similarly sized clamp opening but have a larger arm assembly above the desktop.
A camera-oriented C-clamp, such as the one included with a NEEWER 22-inch Magic Arm, should be measured even more carefully. Its clamp may fit the desk, but the camera arm’s locking handles and articulated joints can require extra side clearance. That matters if your desk is against a wall or crowded with monitor stands.
How to Measure Your Space
- Measure desktop thickness. Use a tape measure or calipers at the exact edge where you want to mount the arm. Include any desktop pad, glass topper, or thick edge banding. Write down the result in inches and centimeters.
- Find the first obstruction below the desktop. Look directly beneath that mounting point for a drawer box, support beam, keyboard tray rail, cable-management tray, or metal desk frame. Measure from the underside of the desk to that obstruction. Aim for at least 2.5 inches (6.4 cm).
- Check the desk edge shape. A square, flat edge gives a clamp the best grip. A heavily rounded front edge, beveled edge, or desk with a deep decorative apron can reduce the usable clamping area. Keep the clamp’s upper pad fully on a flat section of desktop.
- Measure rear clearance. If the boom arm will sit at the back of the desk, measure from the desk edge to the wall. A 3-inch (7.6 cm) gap is a practical minimum for many mic arms; 4 to 5 inches (10.2 to 12.7 cm) is more comfortable for wide movement.
- Map nearby hardware. Mark the locations of monitor-arm clamps, power strips, cable trays, and desk legs. Do not place two heavy clamps directly beside each other on thin particleboard unless the desk manufacturer approves it.
- Allow for the microphone and arm travel. The clamp may fit perfectly while the arm cannot swing into recording position. Sit at the desk and estimate where the microphone will be: generally 4 to 8 inches (10.2 to 20.3 cm) from your mouth for a close-mic setup.
- Confirm the product’s stated clamp range. Use the manufacturer’s maximum desk thickness, not only a listing photo. If your desktop is exactly at the limit, choose a model with at least 0.25 inch (0.6 cm) of extra capacity.
By Room or Use Case
Home Office Desk
A standard office desk with a 0.75- to 1.25-inch-thick top (1.9 to 3.2 cm) is usually an easy fit for a microphone boom arm clamp. The concern is often the furniture construction below the top. Many desks have a front or rear apron that reduces usable clearance to less than 2 inches (5.1 cm).
For a work-from-home setup, reserve a 3-inch-wide (7.6 cm) section of desk edge and at least 3 inches (7.6 cm) under the top. If you use two monitors, position the microphone arm on the opposite side from the monitor-arm clamp when possible. This spreads load across the desktop and gives each arm room to rotate.
Gaming Desk
Gaming desks often have a slim top, typically 0.6 to 1 inch (1.5 to 2.5 cm), but they may include a raised rear cable tray or steel support bar. The thin desktop is not necessarily a problem; the under-desk frame is. Measure from the underside of the top to the frame rather than assuming the whole edge is open.
A low-profile boom arm can be a good choice when a monitor fills the rear of the desk. Models in the general price range of the FIFINE BM88, around $50 to $60, are designed to keep the arm lower and less visible than a tall scissor arm. Still, leave 2 to 4 inches (5.1 to 10.2 cm) behind the mount for movement and cables.
Standing Desk
On a sit-stand desk, inspect the frame and cable-management tray before choosing a clamp location. The rear edge is often blocked by a crossbar, while side mounting points can be more open. Keep the microphone cable loose enough to travel through the desk’s full height range without pulling tight.
A boom arm and microphone can add several pounds of concentrated load at one edge. Most desks handle that easily, but avoid mounting on a removable cable-management cover or a thin unsupported extension panel. If the desktop is laminate over particleboard, use the included protective pad and avoid overtightening the clamp screw.
Small Bedroom or Apartment Desk
Small desks are commonly placed flush against a wall, leaving no rear swing room. In that case, mount the arm on a side edge or choose an arm that can be oriented inward from the back corner. Allow at least 2 inches (5.1 cm) from the clamp to the wall for the base and cable path, though 3 inches (7.6 cm) remains safer.
Budget clamp accessories can cost under $10, while complete entry-level microphone boom arms are often around $20 to $30. The lower price does not automatically mean the clamp is smaller, but it does make careful measurement especially important because replacement mounting options may be limited.
Overhead Camera or Craft Setup
For an overhead camera arm, clearance is not just about the clamp. The arm needs enough space to extend above the work surface without colliding with shelving, a monitor, or a wall. A 22-inch articulated arm, such as the NEEWER UA057 category of camera mount, may cost around $30 to $40 and is best used on a stable desk edge with clear space around its locking handles.
Do not assume a microphone clamp is suitable for a camera arm or vice versa. Camera setups create leverage when extended, especially with heavier cameras. Follow the arm maker’s weight limit and mount it only on a structurally solid part of the desk.
Common Sizing Mistakes
- Measuring only the desktop thickness. The clamp screw and lower pad need empty space beneath the desk, not just a thin desktop.
- Ignoring a desk apron or support rail. A desk can be 1 inch thick but have only 1.25 inches of usable clamp clearance because of framing below it.
- Mounting too close to a wall. The arm may install but be unable to rotate backward, fold away, or route its cable cleanly.
- Using the rounded corner as a mounting point. Clamp pads need broad, flat contact. Corners and curved edges can create an unstable grip.
- Forgetting monitor-arm hardware. Two clamps may compete for the same under-desk space, particularly on narrow desks.
- Overtightening on hollow or particleboard furniture. Tighten until secure, not until the desktop surface dents or the clamp pad sinks into the finish.
FAQ
How much space do I need under a desk for a microphone boom arm clamp?
Plan for 2.5 to 3 inches (6.4 to 7.6 cm) of unobstructed space below the desktop. Some clamps can work with less, but this range leaves room for the lower jaw and tightening knob. Always compare your measurement with the specific product’s published maximum desk thickness.
Will a boom arm clamp fit a 2-inch-thick desk?
Many will, but it is close to the limit for basic microphone arms. Look for a clamp rated for at least 2.25 to 2.4 inches (5.7 to 6.1 cm) rather than one rated at exactly 2 inches. Also verify that a drawer rail or desk frame does not block the lower clamp pad.
How far should a boom arm be from the wall?
Leave at least 3 inches (7.6 cm) behind the desk for a typical scissor arm. A 4- to 5-inch gap (10.2 to 12.7 cm) gives better rotation and easier cable routing. If the desk must sit against a wall, a side-mounted or low-profile arm is often the better solution.
Can I clamp a boom arm to a glass desk?
Only if both the desk manufacturer and boom-arm manufacturer permit it. Tempered glass may still be vulnerable to concentrated clamping force, especially near an edge. A solid wood or metal-framed desktop is the safer choice. If you use glass, avoid overtightening and use protective pads designed for the clamp.
Related guides
- What Size Backdrop Stand for Bedroom Green Screen? Size Guide With Measurements
- How Much Acoustic Coverage for Small Streaming Room? Size Guide With Measurements
- What Size Stream Deck for Single Monitor Streaming Setup? Size Guide With Measurements
- What Size Ring Light for Close Up Face Streaming? Size Guide With Measurements
