
Upgrading from a cheap headset or basic USB mic to an XLR broadcast setup is one of the most rewarding improvements you can make to your live stream. However, XLR equipment is not strictly plug-and-play. When installed incorrectly, streamers face ground-loop hums, harsh digital clipping, muffled voice capture, and desk clutter that restricts monitor movement and mouse tracking.
A successful setup requires balancing two disciplines: audio signal engineering and clean workspace ergonomics. Proper cable routing, boom arm mounting, interface gain staging, and acoustic placement ensure your voice sounds rich, clear, and professional without cluttering your desk.
As an Amazon Associate we earn from qualifying purchases at no extra cost to you. Product prices and availability are accurate as of the date shown and are subject to change.
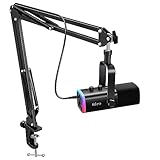

What You Need
Before assembling your streaming station, gather the core hardware components. You can buy these individually or choose an integrated bundle.
| Item | Why It Is Needed | Optional? |
|---|---|---|
| XLR Microphone | Captures voice dynamics with analog clarity (e.g., dynamic mics like the FIFINE AmpliGame AM8T at $67.99). | No |
| Audio Interface / Mixer | Converts the analog XLR signal into a digital USB feed for your PC (e.g., standalone units or bundles like the FIFINE AmpliGame KS5 at $99.99). | No |
| Balanced XLR Cable | A 3-pin cable (typically 6 to 10 feet) that carries the balanced audio signal with noise rejection. | No |
| Boom Arm or Heavy Desk Stand | Isolates the mic from desk bumps and holds it close to your mouth; should support 1.5 to 4.0 lbs. | No |
| Closed-Back Headphones | Allows real-time, zero-latency monitoring without audio leaking back into the mic capsule. | Recommended |
| Pop Filter / Foam Windscreen | Diffuses harsh plosive air bursts (“p”, “b”, “t” sounds) that distort the capsule. | Recommended |
| Desk Reinforcement Plate | Distributes clamp pressure on thin (under 0.75-inch) or composite wood desktops. | Optional |
Step-by-Step Setup Guide
Step 1: Mount and Anchor the Boom Arm (Time: 5–10 Minutes)
Position the C-clamp of your boom arm to the side or rear of your desk rather than directly in front of your keyboard. Most C-clamps accommodate desktop thicknesses between 0.5 and 2.5 inches. If you use a hollow-core or particleboard desk, place a steel reinforcement plate or small hardwood block between the clamp and the underside of the desk to prevent surface cracking. Tighten the clamp fully so there is no lateral wobble, and route the arm so it can swing freely past your monitors without blocking your camera frame.
Step 2: Attach the Shock Mount and Microphone (Time: 5 Minutes)
Screw the microphone shock mount or integrated pivot mount onto the 3/8-inch or 5/8-inch threaded stud at the end of the boom arm. Thread your microphone into place until snug, ensuring the capsule faces the intended direction. Identify whether your mic is end-address (you speak into the top) or side-address (you speak into the front face). Position the microphone roughly 2 to 4 inches away from your mouth, angled at 45 degrees toward your chin to let plosive air blasts pass harmlessly to the side.
Step 3: Connect the Physical Signal Chain (Time: 5 Minutes)
Plug the female end of the 3-pin XLR cable firmly into the base of the microphone until the locking tab clicks. Run the cable down the integrated channels of your boom arm, or secure it every 8 inches with hook-and-loop cable ties to prevent cable sagging. Plug the male end into Input 1 of your audio interface. Connect the interface to your PC using the manufacturer-supplied USB cable, plugging directly into a motherboard rear USB port rather than an unpowered external hub.
Step 4: Calibrate Hardware Gain and Phantom Power (Time: 10 Minutes)
Plug your closed-back headphones into the interface’s 3.5mm or 1/4-inch headphone jack. If you are using a condenser microphone, activate the +48V phantom power toggle; if you are using a standard dynamic microphone, leave phantom power off. Speak into the microphone at your normal energetic streaming volume. Slowly turn the interface gain knob clockwise until the indicator LED flashes green/amber on your loudest words. If the LED turns red, turn the knob back counterclockwise by roughly 10% to prevent hardware distortion.
Step 5: Configure PC Audio and Streaming Software (Time: 10 Minutes)
Open your operating system’s sound control panel and set your audio interface as the default input device. Modern 2026 broadcast configurations run best at 24-bit, 48,000 Hz (Studio Quality). In OBS Studio or your preferred broadcasting suite, add an “Audio Input Capture” source pointing to your interface. In your digital mixer, adjust the software fader so your loudest voice peaks settle naturally between -18 dB and -12 dB in the yellow zone, leaving sufficient headroom for excited shouts without clipping.
Mistakes to Avoid
- Speaking into the Wrong Axis: Many streamers speak into the top of a side-address mic or the side of an end-address mic, resulting in a thin, distant, hollow sound.
- Stacking Digital Gain over Low Hardware Gain: Setting your physical interface knob near zero and boosting the volume slider inside your streaming software introduces severe digital noise and hiss. Get clean level at the hardware preamp first.
- Running Audio Lines Parallel to High-Draw Power Cables: Laying an unshielded XLR cable directly against high-wattage PC power cords or monitor power bricks can induce a persistent 60Hz electrical hum. Cross power cables at 90-degree angles whenever possible.
- Skipping Desk Isolation: Clamping a boom arm without a shock mount to a desk where you aggressively type or move your mouse will transmit heavy sub-bass thumps straight into your stream.
How Often to Maintain Your Setup
Audio gear requires light, consistent upkeep to remain in peak condition:
- Weekly: Remove and wash foam windscreens in warm, soapy water; let them air-dry completely before reinstalling. Wipe down metal mic chassis with a dry microfiber cloth to remove dust and moisture.
- Monthly: Check boom arm tension knobs and desktop clamps. Constant repositioning naturally loosens tension thumb-screws over time. Inspect your XLR cable relief points for bending or crimping.
- Before Every Stream: Run a 10-second local recording in your broadcast software. Verify your voice meter hits the -18 dB to -12 dB target to ensure an operating system update has not reset your master input volume.
When to Call a Pro or Replace Hardware
If you hear crackling when you turn the gain knob, the internal potentiometer may have collected dust; an electrical contact cleaner spray often fixes this, but persistent static signals a failing preamp that requires interface replacement ($50 to $180). Replace your XLR cable immediately if flexing the wire near the connector produces pops or drops the signal.
If you experience persistent background echo or room reverberation despite proper mic proximity, your room’s acoustics are the bottleneck. You may want to consult an acoustic specialist or install dense acoustic panels (45 to 90 kg/m³ rockwool or fiberglass) on primary reflection points across your studio walls.
Frequently Asked Questions
Can I connect an XLR microphone directly to a PC without an interface?
No. Standard PC motherboard 3.5mm microphone jacks provide insufficient voltage and lack the balanced preamplification circuitry needed to power and read a professional XLR signal. You must use an audio interface, mixer, or an XLR-to-USB adapter with a built-in preamplifier.
Should I choose a dynamic or condenser microphone for streaming?
Dynamic microphones are generally preferred for home streaming because their heavier diaphragms naturally reject ambient room noise, such as keyboard clicks, PC fans, and untreated room reflections. Condenser microphones offer more high-end detail and sensitivity, but require a quiet, acoustically treated room to avoid picking up unwanted background sounds.
Why is my XLR microphone producing a quiet buzzing or humming noise?
A continuous low hum is usually caused by an electrical ground loop or electromagnetic interference (EMI). Ensure your PC and audio interface are plugged into the same surge protector, keep your XLR cable away from power strips and AC power cables, and verify that you are using a balanced 3-pin XLR cable.
How close should my mouth be to an XLR broadcast microphone?
The sweet spot for most dynamic broadcast microphones is 2 to 4 inches away. Staying close takes advantage of the “proximity effect,” which imparts a warm, deep low-end to your voice while maximizing your voice-to-room-noise ratio.


