
Heavy microphones expose weaknesses that lighter USB mics can hide. The most common mistake is shopping by appearance: a sleek arm may look substantial but still creep downward once you add a shock mount, XLR cable, pop filter, and a 2-pound broadcast mic. Another mistake is comparing only the microphone’s listed weight rather than the total load at the end of the arm. A third is buying an arm with plenty of capacity but too little reach for the desk, monitor layout, or recording position.
For a dependable setup in 2026, think of a boom arm as a small piece of adjustable furniture: it needs a stable base, enough range to suit the room, joints that stay where they are placed, and hardware that remains convenient to use every day. The right choice is not necessarily the most expensive one. It is the arm whose reach, mounting method, load rating, and adjustment feel match your microphone and workspace.
As an Amazon Associate we earn from qualifying purchases at no extra cost to you. Product prices and availability are accurate as of the date shown and are subject to change.
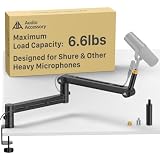
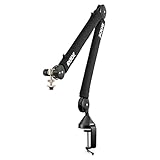


Top 3 picks at a glance
Decide These 3 Things First
- Calculate your real hanging weight. Add the microphone, shock mount or cradle, pop filter, cable, and any adapter. A Shure SM7B weighs about 1.7 pounds; with a typical shock mount, cable, and pop filter, the arm may be supporting 2.5 to 3.5 pounds. A Blue Yeti is roughly 2.2 pounds before accessories. Choose an arm rated at least 25% above your complete setup weight; 50% overhead is even better for frequent repositioning.
- Measure the working zone, not just the desk. Measure from the intended clamp location to your mouth position. Most seated desk setups need 28 to 36 inches of horizontal reach. If the arm must travel around a 27- to 32-inch monitor, a low-profile arm with 30 inches or more of reach is often easier to live with than a conventional spring arm.
- Choose the mounting approach. A desk clamp is easiest and works on most desktops from about 0.4 to 2.4 inches thick. A through-desk grommet mount is more secure for heavy gear but requires a hole, typically 0.4 to 2 inches in diameter. Do not clamp to a hollow-core desk edge, a glass top, or a thin shelf without confirming that the furniture can handle concentrated pressure.
Size, Reach, and Desk Clearance
Arm length determines whether the microphone can reach you without sitting directly in front of the monitor. A compact arm with 20 to 26 inches of reach works for a shallow desk, usually 20 to 24 inches deep, when the clamp is placed near the front corner. For a standard 24- to 30-inch-deep desk, look for 28 to 36 inches of total reach. Larger workstations, standing desks, and setups that place the arm behind a display may need 36 to 40 inches.
Vertical range matters as much as horizontal range. A good arm should raise the microphone at least 14 to 18 inches from its lowest practical position, allowing it to clear a monitor or sit above keyboard level. Low-profile arms tend to run parallel to the desk and are particularly useful when a camera is mounted above the screen. Traditional scissor arms can offer more vertical lift, but their exposed springs and wider motion path can crowd a compact workstation.
Check folded size, too. An arm that folds to 16 to 20 inches is easier to park beside a monitor when not recording. If your desk sits against a wall, leave 3 to 6 inches of rear clearance for an arm that swings behind its mounting post.
Material and Finish
For heavy microphones, steel and aluminum are the materials to prioritize. Powder-coated steel offers stiffness and durability, especially in clamps, pivots, and internal support plates. Aluminum arm sections reduce visual bulk and can still be very rigid when their walls are thick and joints are well designed. Many dependable models use both: aluminum tubes or cast sections with steel fasteners and a steel desk clamp.
Avoid treating “metal construction” as a complete specification. A metal arm can still have thin stamped brackets, small plastic pivot housings, or a lightweight clamp. Look closely at the load-bearing areas: the desk mount, vertical post, elbow joints, and microphone-end connection should feel purposeful rather than decorative.
Finish is partly aesthetic but still practical. Matte black hides fingerprints and blends into most recording setups. White can disappear against pale walls and light furniture; the AA AUDIO ACCESSORY 950 mm white arm is an example of a longer-format option aimed at this look. A powder-coated finish is preferable to thin painted surfaces because it is less likely to chip around frequently adjusted joints.
Construction: Joints, Springs, and the Mount
The arm’s joints determine whether it holds position. Heavy-mic arms generally use one of three approaches: external springs, enclosed springs, or friction-and-locking pivots. External spring arms are easy to identify and can offer wide movement, but exposed springs may look busy on camera and can pinch cables. Enclosed spring designs, such as the RØDE PSA1+, present a cleaner appearance and usually provide smoother movement. Friction-lock designs use adjustable tension at each pivot and are common in low-profile arms.
For a 3-pound working load, prioritize pivot joints with metal-to-metal fasteners and accessible tension adjustment. A single central knob can be convenient, but separate adjustments at the base, elbow, and microphone head provide more control. “Never sag” claims should be treated as a design goal, not a substitute for checking the published load limit and properly setting tension.
The clamp deserves equal attention. Look for a clamp pad at least 1.5 inches wide, a broad contact plate, and a screw with a swiveling protective pad. A clamp that opens to 2 inches is enough for many desks, while 2.4 to 2.75 inches suits thicker solid-wood tops. If you use a sit-stand desk, inspect the underside first: crossbars, cable trays, and shallow aprons can block clamp access.
Comfort and Everyday Performance
A boom arm should be quiet and easy to reposition with one hand. The best models move without sudden drops, spring twang, or repeated tightening. This matters most if you alternate between close speech recording and video calls. A microphone placed 4 to 8 inches from the speaker’s mouth often delivers a fuller voice and reduces room noise, so the arm needs enough controlled movement to maintain that position.
Cable management is another everyday feature. Integrated channels or removable cable clips keep an XLR cable from looping into the camera frame or snagging on the desk. Make sure the routing path accommodates a standard 6- to 8-mm XLR cable; overly tight channels can be frustrating with thicker braided cables.
Check the microphone-end thread. Most broadcast accessories use a 5/8-inch thread, while many arms include a 3/8-inch adapter. Keep the adapter even if you do not need it immediately. A ball joint or rotating head is useful for side-address microphones such as the SM7B, because it lets you aim the capsule correctly without twisting the entire arm.
As examples, the AA AUDIO ACCESSORY desk-mount arm lists a 6.6-pound capacity and is positioned for microphones including the SM7B, SM7dB, MV7, Blue Yeti, and RØDE PodMic. The FIFINE BM66 is another heavy-metal arm intended for podcasting. In each case, confirm the current included mount hardware and published capacity before ordering.
Price Tiers and What You Gain
Budget: $35 to $65. Expect basic steel scissor arms or simple low-profile designs, a desk clamp, and cable clips. A realistic rated capacity for worthwhile heavy-mic options is 3 to 6.5 pounds. At this level, inspect the clamp, return policy, and tension controls carefully. The approximately $49.99 AA AUDIO ACCESSORY desk-mount model falls into this value-focused range.
Mid-range: $65 to $110. This is the sweet spot for many home studios. You should find better joint control, cleaner cable routing, sturdier mounting hardware, and capacities around 4.5 to 7 pounds. The $79.99 AA AUDIO ACCESSORY 950 mm arm and the $59.99 FIFINE BM66 sit near the budget-to-mid transition, depending on current pricing and configuration.
Premium: $110 to $170. Expect refined motion, quieter spring systems, durable finishes, stronger fit and finish, and better long-term parts support. The RØDE PSA1+ at about $112 is a useful reference point for this category. Premium pricing is most justified when you reposition the arm daily, record on camera, or need a cleaner, more polished workstation.
Above $170, spend only for a specific need: an unusually long reach, a specialized broadcast mount, a custom finish, or a system that integrates with professional studio furniture. A higher price alone does not guarantee a higher load rating.
Warranty, Support, and Replacement Parts
Look for at least a 12-month warranty. Two years is preferable for an arm used daily, especially one with internal springs or gas-assisted mechanisms. Read what the warranty covers: finish wear and accidental damage are often excluded, while failed springs, loose pivots, and defective clamps are more relevant concerns.
Replacement availability matters more than it may seem. The parts most likely to need attention are cable clips, thread adapters, clamp pads, tightening knobs, and microphone-end mounts. A manufacturer that can supply a replacement 5/8-inch adapter or desk clamp can extend the useful life of the arm by years. Keep the receipt and retain all included adapters after installation.
Delivery, Assembly, and Installation
Most boom arms arrive in one box and take 10 to 25 minutes to install. A simple clamp-mounted model may require no tools. Grommet mounting usually takes longer because you must access the underside of the desk and may need a drill if no cable hole already exists.
Before delivery, check the package weight if you live in a walk-up building or need to transport it to a home office. Most single boom arms weigh roughly 3 to 8 pounds boxed, while larger all-metal models can be heavier. On arrival, inspect the clamp threads, pivot screws, microphone thread, and finish before discarding packaging.
Install the arm with the microphone removed. Tighten the desk clamp until secure but do not crush wood veneer or particleboard. Then attach the mic, route the cable with enough slack at every joint, and set tension gradually. Test the arm at its furthest extension before placing it over a monitor, keyboard, or audio interface.
Spec Checklist
| Spec | Budget | Mid | Premium |
|---|---|---|---|
| Recommended working load | 3–5 lb | 4.5–7 lb | 5–8 lb |
| Total reach | 24–30 in. | 28–36 in. | 32–40 in. |
| Desk clamp opening | Up to 2 in. | 2–2.4 in. | 2.4–2.75 in. |
| Construction | Steel sections; basic clamp | Steel/aluminum; reinforced pivots | Refined metal construction; premium joints |
| Cable management | Clip-on guides | Clips or partial channels | Integrated concealed routing |
| Typical price | $35–$65 | $65–$110 | $110–$170 |
| Warranty target | 1 year | 1–2 years | 2 years or better |
Red Flags
- A load rating that is missing, vague, or stated without saying whether it includes accessories.
- A maximum capacity equal to your microphone’s weight, leaving no margin for a shock mount, cable, or pop filter.
- Plastic clamp threads or a narrow clamp pad on a heavy setup.
- No 5/8-inch mount or 3/8-inch adapter information.
- Only product photos, with no stated reach, clamp range, or warranty.
- An arm that requires rear clearance your desk does not have.
- Claims of universal compatibility without a specified weight limit.
FAQ
How much weight capacity do I need for an SM7B?
Choose an arm rated for at least 3 pounds, and preferably 4 to 5 pounds, after adding a shock mount, XLR cable, and pop filter. The SM7B itself is about 1.7 pounds, but the complete hanging load is commonly much higher.
Is a low-profile boom arm better than a scissor arm?
Low-profile arms are usually better for camera-facing desks and monitor-heavy setups because they sit below or behind the display. Scissor arms often provide more vertical range and can be a good choice for standing desks or tall monitor arrangements. The better option is the one that reaches your speaking position without blocking the screen.
Can I clamp a heavy boom arm to an IKEA-style particleboard desk?
You can, but use caution. Clamp near a supported leg, frame, or reinforced edge rather than the unsupported center of a hollow or particleboard top. A small wood or metal reinforcement plate can spread the pressure. Avoid overtightening, which can crush the desktop material.
Why does a boom arm sag even when the microphone is below its weight limit?
The tension may need adjustment, the arm may be extended farther than intended, or accessories may have pushed the total load above the rating. Cable tension can also pull an arm downward. Re-route the cable with slack at each joint, reduce extension where possible, and adjust pivots gradually with the microphone supported.


